MAYA金属材质教程(1)
来源:互联网 作者:未知 发布时间:2010-08-07 09:55:21 网友评论 0 条
MAYA金属材质教程
MAYA材质最常见的莫过于金属材质和金属材质,今天再来学习一下用MAYA打造金属材质
Creation of a shot. Texturing
Spending time in a story saves up work. Let´s do it step by step. First of all, we´ll do balance of which elements will appear on the shot. I think a good way to begin is to define the position of the camera, the elements that go in and out of its field of vision and the distance from them to the camera. When the project gets more complicated with the construction of several shots, a good method to be organized is to draw a story board. The storyboard gives us the advantage of having a sketch of all the work that is going to be done. In this case it´s not necessary as we are dealing with only a shot, but it would be convenient to draw a sketch of it, even if it´s just mental. One of the main reasons of having a sketch before doing anything is to know what exactly we are facing, I mean which things have to be created and which not. This is very important at work as that way we avoid creating elements or textures that are too detailed that afterwards are not going to be appreciated because of the motion blur, depth of field or simply because of directing reasons (it even gives the chance to reach an agreement when the result depends on several people). Because of all that, is good to take a pencil and a sheet and spend a few minutes to decide roughly which is going to be the initial point to develop.

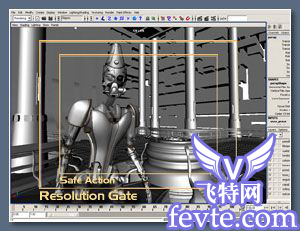
Composition or photography of the shot. Once we have the sketch of the shot, even if it´s only in our mind, it´s time to bring it to the screen. It´s at this moment when we´ll determine the composition or photography of our shot, by the placing, in our case, of the character in first term and the orb and columns of the background. There are some rules that make a composition effective and one that I often take in account is that normally we begin to examine an image from left to right. Another important rule is not to place the main element of the shot in the center of the composition.
In my opinion, this composition, even without being too complicated, is effective. Our sight goes from the left and come across the vertical and impacting figure of our character, to go on towards the right and relax with the orb and the blocks that form the background, that contain more horizontal lines on its shape. It is very useful to allow the software show us the resolution gate and the safe action frame of the camera, so we can decide in a precise way which are the margins of our shot. (In maya we find it in Panel -> View -> Camera Settings)
Lighting is very important Once we are more or less satisfied with the composition of the elements, it would be good to do a study of the light . This is a fundamental step, because by it we define which is going to be the motif of our shot. Personally, I have always taken into account that lights have the quality of modeling our environment, that's why I think that not paying attention to this step could decrease the aesthetic quality of the result. For example, in this case, the model was done in a very limited time, and was mission of light in that moment, and textures after that, to give it more consistence. With the lightning study is decided, among other things, the points of the composition from where light will flow and hit the objects giving dramatism and volume, hardness of the shadows of my scene or which objects will shine themselves taking protagonism or weight on the composition. As the process goes on the result can de depured. The color is defined partially throw this step and it's a very important factor at the time of, for example, giving depth to the scene. There is a rule that works visually well when we establish the color theme; it consists on using hot colors at closer distances and cold ones further; it's just a rule but its orientative when we're producing our shot .
I chose, at that moment, a more or less classical lighting, using three points of light: a main one (at right), a fill one and a backlight. As I had my character clearly separated of the background, I decided to use advantage of that situation by establishing by hierarchies, lighting for the background with its own set of lights, and another for the character. A technical advice : Facing the light study in first place makes it less complicated later. The fact of having all the elements of the scene under a neutral color, such as gray, make light and its color take protagonism they demand at this point. Also, lightning the scene with coherent intensities from the beginning allow to avoid problems later; I mean, with a so open software as Maya, the range of different results that can be obtained is very wide, that's why constraining the values of some determining attributes such as light, makes the elements depending on light be under more control
Working with layers : Separating our scene in different layers and joining them together with a digital composition software has huge advantages, such as fine tune in separated parts the elements of the scene to get them integrated and look for the desired look. or having everything modulated so we can change anything if the client requires (in my case the glow of the orb), so we have not to render the other layers again. Organizing a work in layers is fundamental if the look is complicated, as the 3d softwares don't allow many types of actions with objects ; for example, layer transfer modes.
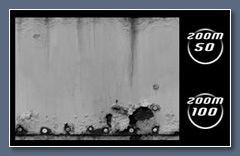
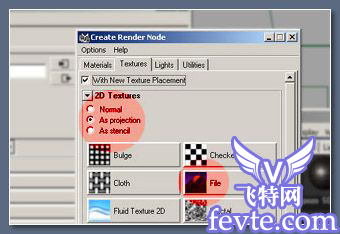
Once the scene is ready for texturing, next step is to decide which textures are going to be used. At this moment it's very useful and reduces very much the work to have a good texture library. For this step I have the CD´s of he 3D Total textures, that contains a wide quantity of images with high quality, very organic and a resolution that supports any type of zoom to the objects. To have available a good library like this make me save many intermediate steps, as I don't have to spend an extra time to make tileable my textures or prepare bump maps as they are included for any texture.
- 2010-08-25
- 2010-08-25
- 2010-08-25
- 2010-05-10
- 2010-08-25
- 2010-08-17
- 2010-05-09
- 2010-05-09
- 2010-08-25
- 2010-08-17
- 2010-08-25
- 2010-05-10
- 2010-08-25
- 2010-08-25
- 2010-08-25
关于我们 | 联系方式 | 广告服务 | 免责条款 | 内容合作 | 图书投稿 | 招聘职位 | About CG Time
Copyright © 2008 CGTime.org Inc. All Rights Reserved. CG时代 版权所有