MAYA金属材质教程(3)
来源:互联网 作者:未知 发布时间:2010-08-07 09:55:21 网友评论 0 条
This process becomes very interactive, in such a way that attributes as luminance, saturation, hue, curves, levels and so one are done in a moment, without using any other Maya node. Trough IPR or render we can localize the detail of certain textures over the objects, so from Photoshop we can remark them and improve them.

Using Photoshop clone stamp tool we can vary the textures, duplicating interesting details in an organic way or even, creating new textures from other.
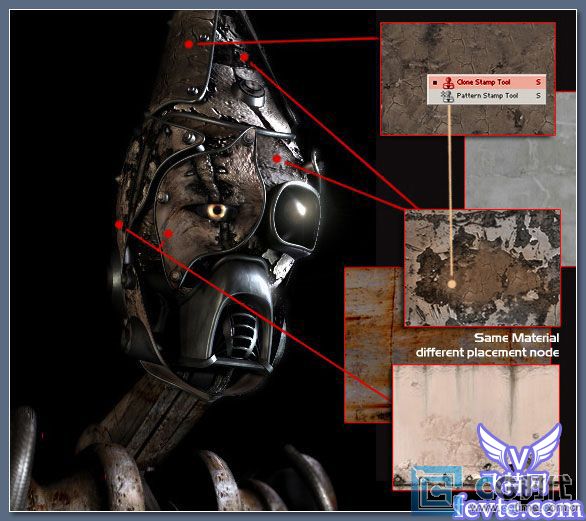
Some times we will have to create different placement nodes so the same material will be suitable to various objects. A smart way to do so is through a switch, which allows the same material to have specific placements to each object. Another option, in case we don't have much time, is to repeat the shading group and apply it to each object, changing the placement with no need of extra connections. In this way less work is required and the integration is worst in the hierarchy of the scene.
Once the shot is ready to be rendered definitively, we must pay special attention to the render globals variables. By activating or not 3d motion blur or raytracing can make the final result vary very much, that's why it's recommended to make decisions about these variables from the beginning. One of these variables, which is fundamental and usually not is the multipixel filtering, which can soften excessively the rugosity of our materials ( bump and specular) losing the required sharpness in occasions.
- 2010-08-25
- 2010-08-25
- 2010-08-25
- 2010-05-10
- 2010-08-25
- 2010-08-17
- 2010-05-09
- 2010-05-09
- 2010-08-25
- 2010-08-17
- 2010-08-25
- 2010-05-10
- 2010-08-25
- 2010-08-25
- 2010-08-25
关于我们 | 联系方式 | 广告服务 | 免责条款 | 内容合作 | 图书投稿 | 招聘职位 | About CG Time
Copyright © 2008 CGTime.org Inc. All Rights Reserved. CG时代 版权所有