Illustrator绘图教程:绘制飘逸的丝带(3)
来源:互联网 作者:未知 发布时间:2011-03-22 19:27:55 网友评论 0 条
Last segment gradient consists of : 50% cyan and 7% magenta, then again 50% cyan and 7% magenta followed by 31% cyan and 5% magenta.
You probably have to use 'Send to back' or 'Bring to front' on the different segments to get them into the correct perspective.
Step 7 - fine tuning the centered curve of the ribbon
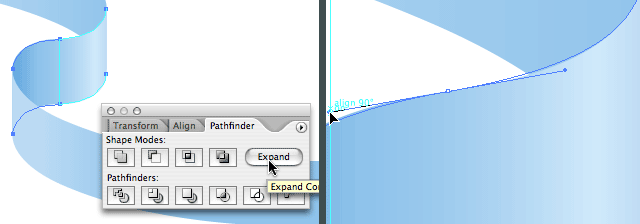
As you probably have notice, the curve in the center doesn't look that natural. That's because I drew that part holding down the shift key, but this was needed to make sure the rotated ribbon would match perfectly on the original one. I can correct this very easily, but first I need to expand the 2 merged segments. Select both segments and click 'Expand' in the Pathfinder palette. This way the vertical line connecting the 2 segments disappear and we have only 2 bezier points left. Now it's a matter of dragging the handles into the preferred position to smooth the curve of the ribbon.

Ah! Much better don't you think? :)

You can make the ribbon larger by copying the entire ribbon and paste it next to the ribbon. You can also merge the middle segment that connects the 2 ribbons. Then you can select the entire ribbon and use the Free Distort Filter to achieve extra depth. Last but not least you can rotate the ribbon. That's what I did in my illustration.