Illustrator矢量绘图:设计一个色彩斑澜的U盘(1)
来源:互联网 作者:未知 发布时间:2011-03-24 10:18:14 网友评论 0 条
Illustrator矢量绘图:设计一个色彩斑澜的U盘
本教程,我们会教你使用渐变和简单的形状是如何绘制一个半写实的闪存盘的。制作U盘上的印花图案我们会用到自己创建的自定义笔刷。我们还会教你如何使用Illustrator中的全局色,以使我们非常快地更改一个对象的颜色。
Final Image Preview
To begin with let’s have a look at the image we’ll be creating.
成品图预览
首先让我们先来看一下我们将要绘制的成品图。

Step 1
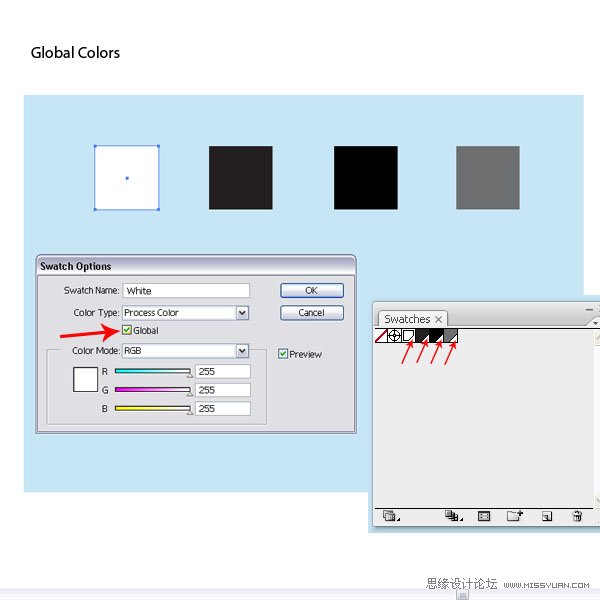
Before we begin, we will have a look at the Swatch Palette. We need to set up our Global Colors right from the start. I picked four colors as a base. I chose a white, black and two grays. Once I added them in my Swatch Palette, I deleted all other color swatches.
Now let’s set up the Global Colors. Double-click on the Color Swatch. In the Swatch Options Menu, select the option Global. Leave the Color Type at Process Color, then click OK. The Color Swatch now has a small white triangle in the bottom right corner. This indicates that the color is now a Global Color. If we apply a Global Color to any object or path, we can later change the color on the fly and it will be applied where the Global Color was added.
1. 在我们开始教学之前,我们先来看一下色板。首先,我们先要设置全局色。我选了4种颜色作为基色,我选了白色,黑色和2个灰色。当我们把这4种颜色拖进色板调板之后,我就可以删除其它不需要的色板了。
现在,我们开始设置全局色。在色板上双击,然后在色板选项窗口中,选择“全局色”选项。颜色的类型保留为印刷色,然后点确定。现在色板的右下角有一个小的白色的三角形,这表示这个颜色现在是全局色了。如果我们把全局色应用到某个对象或者路径时,我们在之后还可以很快地更改原来的颜色,并且应用的还是新增的全局色。
- 2009-10-14
- 2009-10-14
- 2009-10-14
- 2009-10-14
- 2009-10-14
- 2009-10-14
- 2009-10-14
- 2009-10-14
- 2009-10-14
- 2009-10-14
- 2009-10-14
- 2009-10-14
- 2009-10-14
- 2009-10-14
- 2009-10-14
关于我们 | 联系方式 | 广告服务 | 免责条款 | 内容合作 | 图书投稿 | 招聘职位 | About CG Time
Copyright © 2008 CGTime.org Inc. All Rights Reserved. CG时代 版权所有