Photoshop教程:绘制逼真的油漆毛刷(12)
来源:互联网 作者:未知 发布时间:2011-05-25 10:52:34 网友评论 0 条
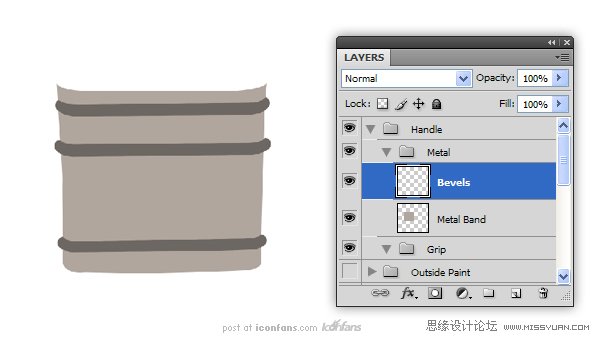
Step 23
Create a New Layer called “Bevels” and draw in some bevels. You can usethe Pen Tool if you wish, but I just used the Brush Tool.
(新建一个图层命名为“Bevels”,画一个一样的斜面。如果你愿意,你可以使用钢笔工具,但是我就用了画笔工具.)
Step 24
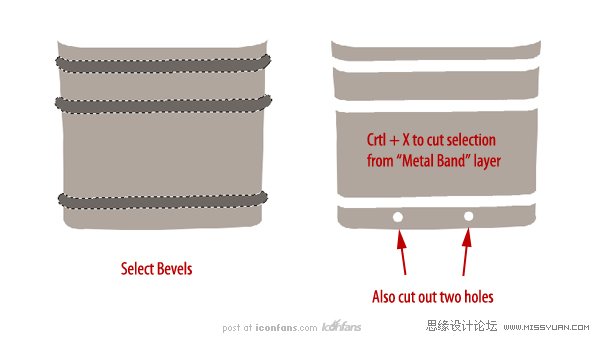
Use the “Bevels” layer to makea selection (Command/Ctrl + Click the thumbnail). Use this selection to Cut(Command/Ctrl + X) the “Metal Band” layer. Also cut out some holes for rivets.All of these cuts will give us more edges for the Bevel and Emboss effect inthe next step.
(使用“Bevels“图层作一个选项(Ctrl +点击缩略图)。使用此选项來剪切(/按Ctrl+X)的“Metal Band” 图层。也削減了一些鉚釘孔。在下一个步骤中,我們將給予所有這些切图更多的邊的斜面和浮雕效果)
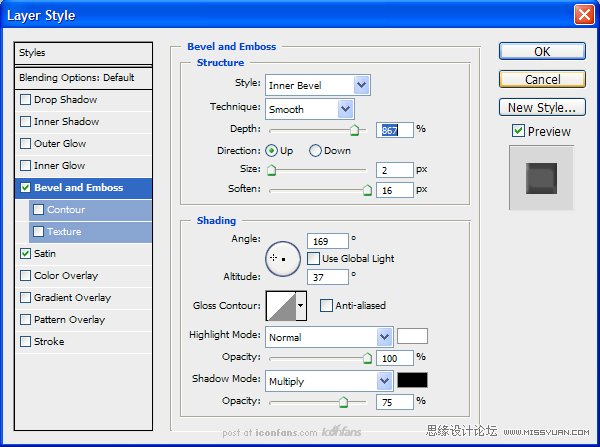
Step 25
Add the following Layer Stylesto the “Metal Band” layer
给“Metal Band”图层添加下面的图层样式,
Step 23
Create a New Layer called “Bevels” and draw in some bevels. You can usethe Pen Tool if you wish, but I just used the Brush Tool.
(新建一个图层命名为“Bevels”,画一个一样的斜面。如果你愿意,你可以使用钢笔工具,但是我就用了画笔工具.)
Step 24
Use the “Bevels” layer to makea selection (Command/Ctrl + Click the thumbnail). Use this selection to Cut(Command/Ctrl + X) the “Metal Band” layer. Also cut out some holes for rivets.All of these cuts will give us more edges for the Bevel and Emboss effect inthe next step.
(使用“Bevels“图层作一个选项(Ctrl +点击缩略图)。使用此选项來剪切(/按Ctrl+X)的“Metal Band” 图层。也削減了一些鉚釘孔。在下一个步骤中,我們將給予所有這些切图更多的邊的斜面和浮雕效果)
Step 25
Add the following Layer Stylesto the “Metal Band” layer
给“Metal Band”图层添加下面的图层样式,
- 2009-10-19
- 2009-10-19
- 2009-10-19
- 2009-10-19
- 2009-10-19
- 2009-10-19
- 2009-10-19
- 2009-10-19
- 2009-10-19
- 2009-11-22
- 2009-10-19
- 2009-11-24
- 2009-10-19
- 2009-10-19
- 2009-10-19
关于我们 | 联系方式 | 广告服务 | 免责条款 | 内容合作 | 图书投稿 | 招聘职位 | About CG Time
Copyright © 2008 CGTime.org Inc. All Rights Reserved. CG时代 版权所有