MAYA建模教程:打造逼真车子玩具(6)
来源:互联网 作者:未知 发布时间:2011-08-16 08:24:52 网友评论 0 条
Make sure you disable Mayas Enable Default Light and enable Use Selected Lights. Make sure you create one light at a time; it helps you see what is going on in the scene. Use the spotlights (SL) in a three-point lighting arrangement and disable Emit Specularon all three lights. Place the area light and point light where you want the highlights to be focused, making sure that theEmitDiffuse is disabled on both light sources.
The light settings are as follows:
Front SL:
Intensity: 80
Decay Rate: Quadric
Cone Angle: 130
Penumbra angle: 10
Dropoff: 2
Right SL:
Intensity: 140
Decay Rate: Quadric
Cone Angle: 65
Penumbra Angle: 40
Dropoff: 1
Left SL:
Intensity: 50
Decay Rate: Quadric
Cone Angle: 65
Penumbra Angle: 30
Dropoff: 1
Point/Area L:
Intensity: 10
Decay Rate: Quadric
Shading :
Lets begin with the shading for the different parts of the car. We will be using MayaMaterialsand RenderPasses.
The most important thing is that we achieve the characteristic reflection that cars have, by which I mean that when viewed from different angles the reflection is greater or less. We achieve that effect by using the sampler info node. The sampler info is outputting Facial Ratio information by receiving input information of the UVcoordinates of the mesh. The chassis has a ramp connected to the specular (ramp1) and the reflectivity (ramp2) nodes.
The cab-top and the wheels have almost the same material settings; you can go ahead and duplicate when ready with one shader and make slight change in the diffuse and color nodes. Adjust to your liking and do not forget to choose a Maya granite 3D texture with a negative low bump value between 0.004-0.010 to create some unevenness in the surface – it is very subtle but it makes all the difference (Fig.10 – 11)!
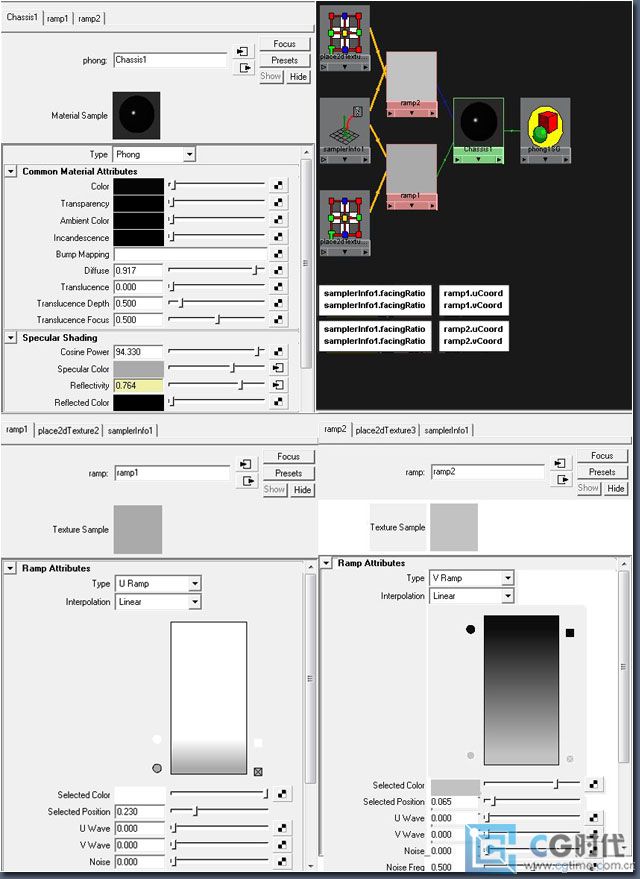
Fig.10
- 2010-08-25
- 2010-08-25
- 2010-05-10
- 2010-08-25
- 2010-05-09
- 2010-05-09
- 2010-08-25
- 2010-08-17
- 2010-08-25
- 2010-05-09
- 2010-08-25
- 2010-08-17
- 2010-05-10
- 2010-08-25
- 2010-05-12
关于我们 | 联系方式 | 广告服务 | 免责条款 | 内容合作 | 图书投稿 | 招聘职位 | About CG Time
Copyright © 2008 CGTime.org Inc. All Rights Reserved. CG时代 版权所有